FOCUS: A Song of Brush and Filter
I needed to blow off some steam after the holiday season, so I tried to recreate the, by now pretty famous, Game of Thrones character posters.
The whole process took about two hours of shooting time and then another four in post - which is a fairly conservative estimate.
If you're interested in a more in depth BTS, keep on reading:
The Final Result
The set-up
Alright, now that we lost all the damn casuals, let's get started:
Important: Reddit user Velrok and I made a couple of changes to get an even more similar look to the actual posters. Head over to reddit to read them.
The "studio" set-up - and I'm using studio in the broadest possible sense here - was:
- A camera (duh) - I used a D7000 + Nikkor 50mm f/1.4
- A tripod
- A flash (SB-24 in my case)
- A remote (disregard this if you have friends or an inbuilt timer ;)
- A (DIY) diffuser/flag - read: some paper & tape
- A black backdrop i.e. a blanket
That's it. After setting up the backdrop and camera, make sure that the flash only lights one side of the face, there's some trial and error involved here, just take your time. I found that having it point slightly up and to the side gets decent results.
Now, make yourself pretty, get in front of the lens and after about 1, 2, 150 shots you should have some keepers.
But onto the good stuff. I hope you like Lightroom, because we're going to spend a lot of time in post:
In case you don't have Lr, you can get a free trial here!


First of all, I need to point out that this isn't an exact step-by-step guide, considering that would we pretty useless as everyone's pictures are going to have different lighting etc. The same goes for the Lightroom settings, I have included some general pointers, but be prepared to experiment.
To the left you can see the iterations I went through, however looking back the best thing is to follow this pattern:
- Import the picture and crop it if need be.
- Use Graduated Filters coming in from each side to get the basic colouration. (Pro Tip: Use multiple filters with different shades of blue to achieve more colour depth.)
- Make the skin rougher by selecting the area with the Adjustment Brush and then crank up clarity and sharpness (maybe play around with contrast). You might have to do this more than once to get the desired effect.
- Use Radial Filters around the eyes to make them pop (increase exposure and overlay some colour if needed).
- Add a Graduated Filter coming in from the bottom and turn down the exposure to darken the area below your neck.
- A Radial Filter around the face to decrease the exposure will get you the vignetting effect.
- Now use the Adjustment Brush to enhance the highlights and shadows to the face, since the coloration will have made it a bit dull looking.
- Tidy the whole thing up with the Adjustment Brush. For example, I had to add a lot of exposure and lighten up the shadows on the right.
- Load the picture into Photoshop to do the final editing - if you don't have it, you can get the free trial via Creative Cloud. You will also need the Game Of Thrones font - download that here.
Got everything?
Great. Export the picture from Lightroom, load it into PS and install the font.

My Photoshop Fu is pretty basic, so take the following with a grain of salt - you will probably do a much better job than I did.
- We start by adding a black background layer and then laying our image on top. This allows you to change size and position.
- Now add the writing - Pro Tip 2: # will insert "Game of Thrones".
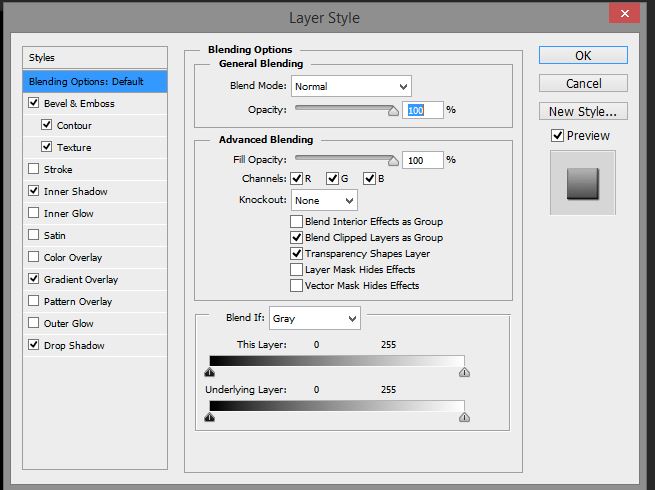
- Add layer effects to the typeface. You can see the ones I've used on the left.
- The only made alterations I made were in the Gradient Overlay tab: Changing the angle and the gradient.
That's it, we're done here. Thanks for reading!